Windows is a great operating system for productivity, but sometimes things go wrong leading you to waste hours of your life just waiting. The issue might have antimalware service executable craving a very high CPU
usage, Disk usage or Memory usage. So typically Windows Defender will be listed as an antimalware service for reporting purposes in Windows.
Contents
Let me introduce you to Antimalware Service Executable 100 disk usage

Antimalware Service Executable process runs on the background of the Windows Defender’s services and it remains continuously running in the background. It is also called “Windows MsMpEng.exe” which is part of the Operating System (OS)
The main responsibility of antimalware service executable high memory usage Windows 8 10 to check malware in the files while accessing them, installing antivirus definition updates evaluating background system scan to survey for dangerous software and various other tasks the security application like Windows Defender requires to do.
If you have ever gone to the task manager and you may ever notice that a certain component of your system is using lots of resources for the antimalware service executable high CPU usage.
So it’s important to have antimalware service running, especially if you do not have any antivirus or antimalware applications on your computer. Because without that it will leave your computer vulnerable to many dangers of the internet.
I have been hit by the 100% disk usage bug in Windows, thankfully I’ve been able to find few solutions to resolve it which I’m going to share with you guys now in order to improve your computer’s overall performance.
In this article, I’ll show you how to keep real-time protection enabled for the Windows defender, but at the same time addressing this unreasonable amount of memory that’s being taken up.
We are going to jump right into here, so if you’re already addressed with the issue, let’s get started!!
1. CHECK DISK USAGE
Now if you’re noticing slow performance in your windows, the first thing to do check your disk usage. This is displayed in the task manager which you can open it directly by pressing CTRL + ALT + DEL or by right-clicking the taskbar and selecting the task manager.
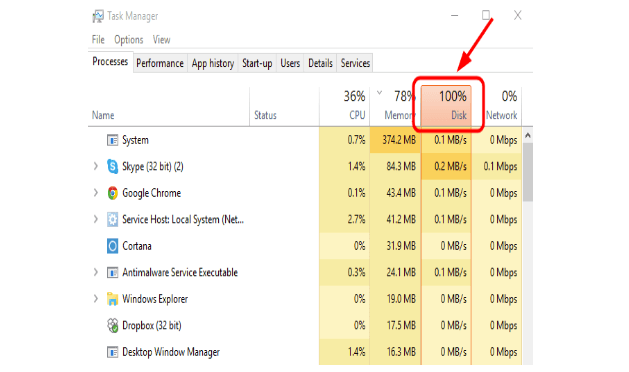
Once the task manager is open look for the disk column, if it displays 100% or consistently higher than 97% and stays like this for more than a minute then you are affected. This basically means that an application or service is regularly utilizing the hard disk drive or solid-state disk. Read more for more details.
2. CHECK ANTI-VIRUS
The first thing you should do is check your anti-virus software is the software is updating or has your computer been affected by malware. Open the anti-virus software and confirm if it has been updated recently, if so then it probably it hasn’t updated now.
Follow this by running a full system scan to detect the malware note that this may take while on to the circumstance so close to all other applications first.
3. DISABLE WINDOWS SEARCH
Windows search has been shown to cause problems with the disk use. To stop this right click start and select Command Prompt (Admin), now type net.exe stop “Windows search”. Check task manager to see the impact of this, if it works you can permanently disable by pressing “Windows key + R” and enter “services.msc”.
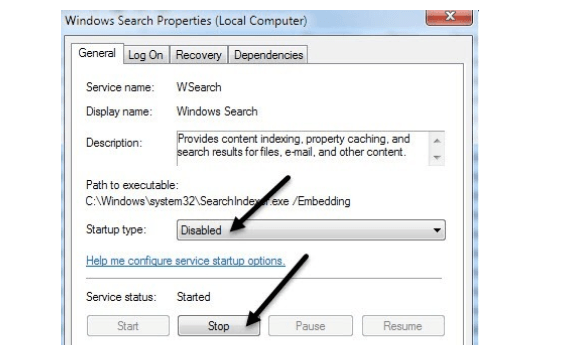
In the services window find Windows search and double-click to open the Windows search properties box.
Find Startup type and select “Disabled” and press Stop to abort the service then click OK to save your changes.
4. DISABLE SUPERFERCH
Another identified cause of disk performance issues in Windows is superfetch. This is a tool that speeds up app launching by preloading apps based on your usage. Again open Command Prompt (Admin) and enter net.exe stop superfetch. After waiting for a few moments to check the impact of this it is worth running chkdsk.exe /f /r. Note that you will need to close your all applications before restarting Windows.
5. COULD IT BE FLASH?
There are a few reasons to have flash running on your computer. It one of the most vulnerable aspects of modern computing and it’s also a common culprit for the 100 disk usage bug. Now open the chrome browser, then settings and find show advanced settings, here click on content settings and find flash.
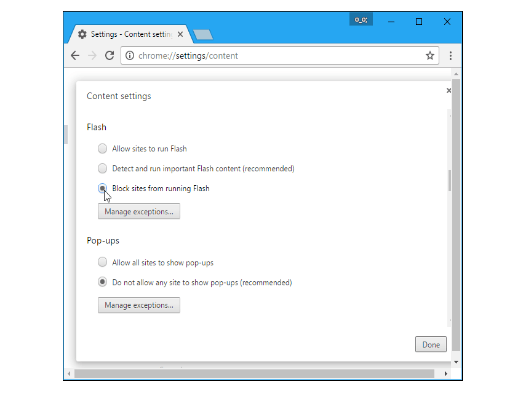
In flash, just select the third option “Block sites from running Flash” and confirm with Done, now restart the browser. Keeping an eye on the disk column and the Task manager to see what impact the action has had.
6. IS IT SKYPE?
Is it Skype eating up your hard disk drive?
This might produce the 100 disk usage bug in task manager, therefore you can perform the necessary actions to resolve this issue as soon as possible. Find out by first removing the Skype from the system tray, next tap “Windows
key + R” and enter this file path “C:\Program Files (x860\Skype\Phone\)”.
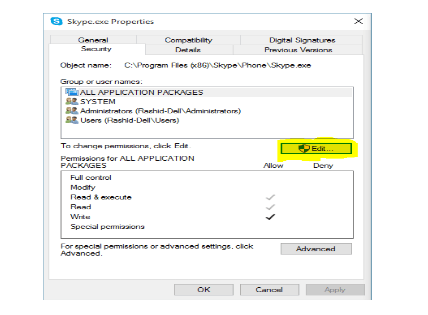
Windows Explorer will open a folder where you’ll see “Skype.exe” right-click the file and select “Properties”, in the security tab go to “Edit” and select “ALL APPLICATION PACKAGES”.
In the allow column checkbox next to “Write”, then click Apply and OK to finish.
7. DISABLE DIAGNOSTIC TRACKING
Finally, Diagnostic Tracking can have a performance impact on Windows. If this is the source of your 100 disk use in task manager, then you can stop the service and prevent it from launching. Right-click the start menu to open a Command Prompt with admin privileges and input sc config “DiagTrack” start=disabled and follow this with sc stop
“DiagTrack”.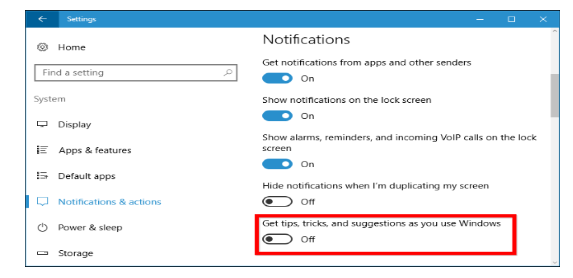
As well as this you can also open System settings and go to Notification & actions disable the option of getting tips, tricks and suggestions as you use Windows.
Is now 100 Disk Usage bug slowing down your Windows Computer after performing all these fixes. Did these fixes work or have you found a new one,
do let me know in the comment section.
CONCLUSION
Let’s wrap up…
The primary reason for writing this post is to make you aware of the 100 Disk Usage bug and I’ve covered all the necessary areas where the bug can arise from and also mentioned the steps to resolve this bug in simple steps.
These methods help me bring out from this problem. So, I hope this post will help you to solve your issue too.
That’s it for this article, make sure to give it a thumbs up and also do not forget to share this with those peoples who are facing the same kind of issue on their computers.